DIY Solar Phone Charger from Dollar Store Parts: Under $15
Build a working solar phone charger for under $15 using dollar store solar lights and one small component. Step-by-step instructions, no electrical experience required. Works during power outages.
Your phone just hit 3% battery, the power has been out for two days, and you have no idea when it's coming back. That phone is your lifeline to emergency alerts, evacuation routes, and contact with your family. Losing it isn't an inconvenience. It's a genuine safety risk.
Here's the good news: you can build a working solar phone charger for under $15 using parts from dollar stores and one small component from Amazon or Walmart. No electrical engineering degree required. No expensive tools. Just a screwdriver, some wire, and 45 minutes.
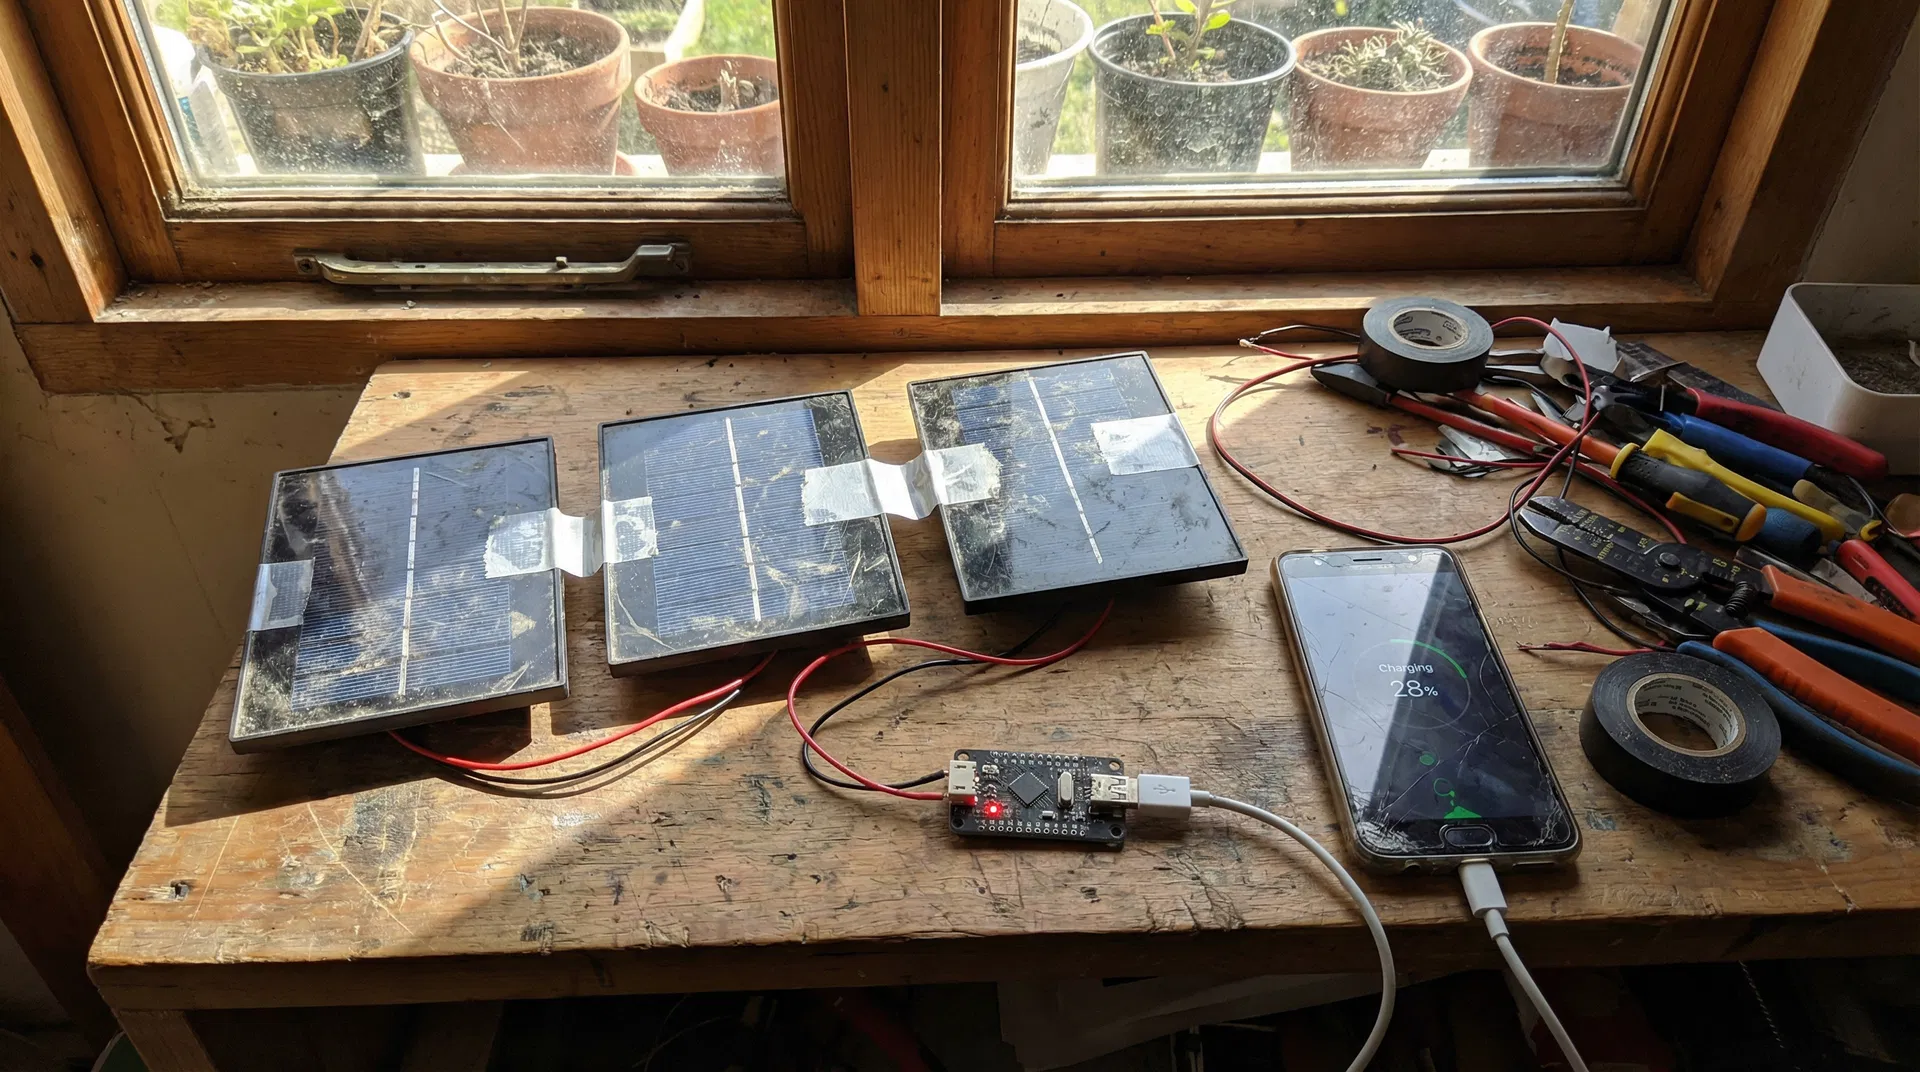
I've built and tested this setup. It works. Let me show you exactly how.
What You Actually Need to Know First
Before the shopping list, a quick reality check that most DIY guides skip.
Dollar store solar garden lights produce 1.2 to 2 volts each. Your phone needs 4.4 to 5.25 volts via USB to charge safely. One solar light alone will not charge your phone. Two won't quite get there either. You need three wired in series to reach the right voltage range.
Voltage without regulation can fry your phone. On a bright sunny day, three solar panels in series can spike above 5 volts. That's enough to damage your phone's charging circuit if unregulated. A $5 to $8 USB voltage regulator module (available at Walmart, Amazon, or any electronics store) solves this completely. It's the one non-dollar-store item in this build, and it's non-negotiable for safety.
This charger is slow. Dollar store solar panels are small, typically 0.5 to 1 watt each. Three panels together give you roughly 1.5 to 3 watts, which translates to about 300 to 600 milliamps at 5V. For comparison, a standard wall charger delivers 1,000 to 2,000 milliamps. Expect 4 to 8 hours of direct sunlight to charge a modern smartphone from 0 to 100%. This is an emergency tool, not a daily driver.
With that said, let's build it.
The Complete Shopping List
| Item | Where to Buy | Cost | Notes |
|---|---|---|---|
| Solar garden stake lights (3) | Dollar Tree, Dollar General | $1.25 each ($3.75 total) | Get the flat-panel style, not globe lights |
| USB DC-DC boost converter module (5V output) | Walmart, Amazon | $5 to $8 | Search "USB boost converter 5V module" |
| Electrical tape | Dollar store | $1 | Already own this? Skip it |
| Small screwdriver set | Dollar store | $1.25 | Flathead and Phillips |
| Total | $10 to $13 |
What to look for in solar lights: The flat rectangular panel style (looks like a small solar panel on a stake) works best. Avoid the decorative globe or lantern styles. The flat panels have larger solar cells and produce more current.
What to look for in the boost converter: You want a module labeled "DC-DC boost converter" or "step-up converter" with a USB output and adjustable or fixed 5V output. The MT3608 or SX1308 chip modules are common and reliable. They cost $5 to $8 for a pack of 5 on Amazon, or about $7 to $8 for a single unit at Walmart in the electronics section.
Tools You Need
- Small flathead screwdriver (to pry open the solar light housing)
- Small Phillips screwdriver (to remove screws if present)
- Wire strippers or scissors (to strip wire insulation)
- Electrical tape (to insulate connections)
- Optional: multimeter (to verify voltage before connecting your phone)
Step-by-Step Build Instructions
Step 1: Disassemble the Solar Lights (15 minutes)
Each dollar store solar light contains a small solar panel on top, a circuit board, a rechargeable battery, and an LED. You only need the solar panel from each light.
- Twist or unscrew the top cap of the solar light to separate the panel section from the stake
- Look for 2 to 4 small screws on the underside of the panel housing. Remove them
- Gently pry apart the housing with a flathead screwdriver
- Inside you'll see the solar panel with 2 wires attached: one positive (usually red) and one negative (usually black or white)
- Cut the wires about 3 inches from the panel, leaving enough wire to work with
- Strip about half an inch of insulation from each wire end
- Repeat for all 3 solar panels
What you'll have: 3 small solar panels, each with a red wire (positive) and a black wire (negative).
Step 2: Wire the Panels in Series (10 minutes)
Wiring in series connects the panels end-to-end, adding their voltages together. Three panels at 1.5V each gives you approximately 4.5V, which the boost converter steps up to a stable 5V output.
Series wiring pattern:
- Panel 1 negative (black) connects to Panel 2 positive (red)
- Panel 2 negative (black) connects to Panel 3 positive (red)
- Panel 1 positive (red) is your final positive output wire
- Panel 3 negative (black) is your final negative output wire
How to connect:
- Twist the wires together tightly at each connection point
- Wrap each connection with electrical tape to prevent short circuits
- Keep your two output wires (Panel 1 positive and Panel 3 negative) free
Test before continuing: Take the two output wires outside in direct sunlight. If you have a multimeter, you should read 3.5 to 5 volts depending on sun intensity. If you don't have a multimeter, that's fine. Proceed to the next step.
Step 3: Connect to the Boost Converter (10 minutes)
The boost converter has input terminals (labeled IN+ and IN-) and a USB output port.
- Connect your Panel 1 positive wire to the IN+ terminal on the boost converter
- Connect your Panel 3 negative wire to the IN- terminal
- Secure connections with a small twist and wrap with electrical tape, or use the screw terminals if your module has them
If your module has an adjustment potentiometer: Use a small screwdriver to turn it until your multimeter reads 5.0 to 5.1V at the USB output in direct sunlight. If you don't have a multimeter, the fixed 5V modules (labeled "5V fixed output") are safer for beginners.
Step 4: Test the Charger (5 minutes)
Before plugging in your phone:
- Take the assembled charger outside into direct sunlight
- Plug a USB cable into the boost converter's USB port
- Plug the other end into a cheap USB LED light or a power bank (not your phone yet)
- The LED should light up, or the power bank should show it's receiving charge
If nothing happens: Check that all wire connections are tight and that the panels are in direct sunlight (not shade). Also verify the series wiring order is correct.
If it works: Plug in your phone. It should show a charging indicator within 30 seconds.
Maximizing Charging Speed
Aim the panels directly at the sun. Solar panels lose 20 to 40% efficiency when tilted just 30 degrees off-angle. Adjust the panel angle throughout the day for maximum output.
Charge during peak hours. Solar output is highest between 10 AM and 2 PM. A 2-hour charge during peak sun equals roughly 3 to 4 hours of off-peak charging.
Keep panels cool. Hot solar panels produce less electricity. If possible, keep the panels in the shade while angling them toward the sun (use a reflective surface to redirect sunlight if needed).
Charge a power bank first, then your phone. Power banks accept irregular charging current better than phones. Charge your power bank during the day, then use the power bank to charge your phone at night. This also protects your phone's battery from the variable current that solar panels produce.
Clean the panels. Dust and debris reduce output significantly. Wipe the panels with a damp cloth before use.
Weatherproofing Your Charger (Optional but Recommended)
Dollar store solar lights are designed to be outdoors, but your wiring connections and the boost converter module are not waterproof.
Simple weatherproofing:
- Wrap all wire connections with self-fusing silicone tape (available at hardware stores for $5 to $8) instead of regular electrical tape
- Place the boost converter module inside a small zip-lock bag
- Secure the bag with a rubber band
- Drill a small hole in the corner of the bag for the USB cable to exit
This isn't professional waterproofing, but it will protect your charger from light rain and morning dew.
What This Charger Can and Cannot Do
It can:
- Charge any device that charges via USB (phones, tablets, earbuds, GPS units, emergency radios)
- Provide indefinite charging capability as long as the sun shines
- Charge a power bank during the day for nighttime use
- Operate for years with minimal maintenance
It cannot:
- Charge quickly (expect 4 to 8 hours for a full phone charge)
- Work in heavy cloud cover or shade (output drops 70 to 90% in overcast conditions)
- Replace a wall charger for daily use
- Charge laptops (requires more power than this setup produces)
Troubleshooting Common Problems
Phone shows "not charging" or charges very slowly: Check that the boost converter output is actually 5V. If it's below 4.4V, your phone won't recognize it as a valid charger. Add a fourth solar panel in series or wait for brighter sunlight.
Charger works sometimes but not consistently: Loose wire connections are the most common cause. Re-strip and re-twist all connections. Consider soldering them if you have a soldering iron.
Boost converter gets hot: This is normal for the module itself, but if it's too hot to touch, you may have a wiring short. Disconnect immediately and check all connections.
Phone charges for a few minutes then stops: Clouds passing over the panels cause voltage drops that can interrupt charging. This is normal. The charging will resume when sunlight returns.
Upgrading Your Setup
Once you've built the basic version, here are cost-effective upgrades:
Add more panels: Each additional panel in series increases voltage (up to the boost converter's input limit, typically 28V). More panels also means better performance in partial shade.
Add a small battery: A $10 to $15 lithium battery pack module (search "18650 battery holder with charging circuit") lets you store solar energy during the day and use it at night.
Build a panel frame: Mount your panels on a piece of cardboard or thin plywood at the optimal angle for your latitude. This eliminates the need to reposition them throughout the day.
Frequently Asked Questions
Will this damage my phone? Not if you use the voltage regulator module. Without it, voltage spikes could damage your phone's charging circuit. With it, the output is a stable 5V, identical to what a wall charger produces.
How long will the solar panels last? Dollar store solar panels typically last 2 to 4 years before UV degradation reduces their output significantly. At $1.25 each, replacement is cheap.
Can I use this to charge my laptop? No. Laptops require 19V to 20V and 45W to 90W. This setup produces approximately 1.5W to 3W at 5V. You'd need a much larger solar array.
What happens on cloudy days? Output drops dramatically. In heavy overcast, you might get 10 to 20% of full-sun output, which is often not enough to charge a phone. This is why charging a power bank as a buffer is strongly recommended.
Is it legal to disassemble dollar store products? Yes. Once you purchase a product, you own it and can modify it however you choose.
The Bottom Line
This $10 to $13 build gives you indefinite phone charging capability as long as the sun shines. It won't replace your wall charger, but in a multi-day power outage, it's the difference between having communication and being completely cut off.
Build it before you need it. Test it in your backyard. Know that it works. Then put it in your emergency kit and forget about it until the lights go out.
Sources and References
- U.S. Department of Energy: How Do Solar Panels Work? - Technical overview of photovoltaic cell operation and voltage output characteristics
- USB Implementers Forum: USB Power Delivery Specification - Official USB voltage and current specifications (4.4V to 5.25V safe range)
- FEMA: Power Outage Safety - Federal guidance on emergency preparedness during extended power outages
- Make: Magazine: $3 Solar-Powered Cell Phone Charger - Original maker community documentation of the solar garden light hack
- National Renewable Energy Laboratory: Solar Cell Efficiency - Research on solar panel performance in varying light conditions
No comments yet. Be the first to share your thoughts!
